Strength in Numbers #139
Pain on the inside of the elbow is common enough in baseball to coin terms such as little leaguers elbow or pitcher’s elbow to describe this type of medial elbow pain. Yet, despite being much more rare in baseball players, pain on the outside portion of the elbow, known as lateral epicondylitis, may also occasionally occur in players.
It’s commonly called tennis elbow, which I recently developed when I started playing tennis to better understand how ArmCare could support other overhead sports. But then, to my amazement, one of my athletes, a player with whom I’ve built a team of three performance specialists, also came down with it.
In this article, we’ll cover some of the mechanics that can lead to lateral elbow pain and then follow up with a treatment plan using ArmCare as a guide.
ANATOMY AND KINESIOLOGY ASSOCIATED WITH LOADING THE CATAPULT
Lateral epicondylitis primarily involves the extensor tendon of the forearm, where it attaches to the lateral epicondyle of the humerus. It’s the bump you feel on the outer part of your elbow.
This area is a convergence point for a number of muscles involved in wrist extension, moving your fingers back, and forearm supination (rotating your palm up like you’re carrying a tray.)
It’s crucial in pitching for things like gripping a curveball and laying the arm back into maximal external rotation.
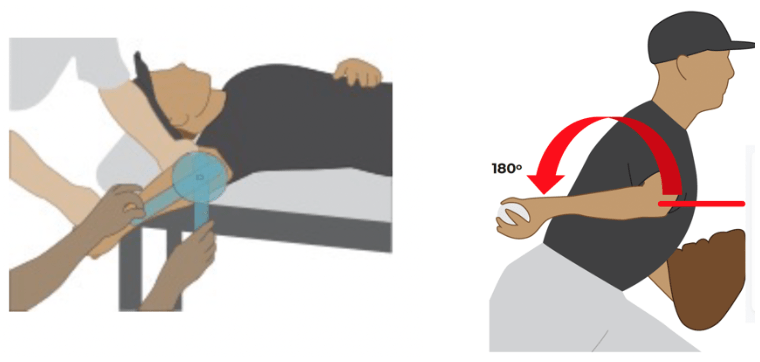
Here’s how you can feel the difference this subtle movement makes:
- Bring your arm into a layback, but maintain your wrist position to keep the palm of your hand facing forward.
- Now, repeat this layback, but turn your wrist so your thumb points backward.
You likely found that you can go further into layback in the supinated position (thumb pointing backward). That’s because the pronator teres and biceps tendon are on slack in this position.
It’s also important to understand this layback interaction for the testing protocols. If you’re not consistent with your hand position during your range of motion testing, it can affect your range of motion test results.
THE MECHANISM OF INJURY
With their complex sequence of acceleration and deceleration, both the throwing motion and swinging a racket subject the lateral epicondyle to significant loads.
During the cocking phase, the lateral forearm muscles concentrically contract to load the wrist, and during the follow-through, they endure a forceful eccentric contraction to decelerate the arm.
If this repetitive stress is combined with an imbalanced shoulder, the arm’s deceleration occurs less at the shoulder, which puts more stress and microtrauma on the lateral elbow to slow the arm during the follow-through.

It’s also important to ensure your arm care testing procedure isn’t overly taxing an already overworked elbow.

Specifically for the lateral elbow, when scaption testing, be sure to keep the fist neutral, like in the image above. I’ve seen players flex their wrist on this assessment, which puts the extensor muscles on full stretch, but then has to contract maximally to push into the wall.
We are just about finished with our updated edition of our Certified ArmCare Specialist Course. It has an additional 4 hours from our previous course, with a lot of additional time spent on the testing piece.
You can watch a full technical breakdown of the scaption test below.
Going on the Attack to Treat & Prevent Tennis Elbow
Lateral epicondylitis can be problematic to treat if you do not take the right approach when returning to performance.
In Part 1 of this series, we indicated that balancing the shoulder and ensuring you are doing the Scaption test properly are important pieces of the puzzle to prevent injuries.
However, you must consider these critical items below to reintegrate into competition successfully.
1. Do not throw or lift with the throwing arm for 48 hours. If you are like me, it’s hard to sit still. You never throw through arm pain, but do you train when you have arm pain? Of course.
For upper body training, break apart your training and use dumbbells within the 48-hour no-throw period to determine if the problem is delayed-onset muscle soreness or something more serious. Avoid pressing, pulling, rowing, curling, or any other loaded movements involving gripping the throwing arm.
You can still do lower body training by holding the dumbbell in your glove hand while you do lunges, RDLs, front rack Kettlebell squats, you name it.
We also discuss cross-education effects in training, where exercises on one side of the body can improve/maintain strength on the other. Now is the time to execute this mystical training phenomenon.
2. Get a medical evaluation if you still have pain after 48 hours. At the 48-hour mark, our athlete was having pain without throwing. Following the Eliminating Pain and Soreness Course, the next step is visiting the orthopedic physician to get a diagnosis.
To my surprise, my player, with lateral epicondylitis, was given a tensor bandage and cleared with a full go-ahead to resume throwing at lower intensity.
I am a little more conservative, so I first wanted to ensure we have pain-free tests before picking up a ball.
After 48 hours and leading up to the doctor’s appointment, I had this athlete warm the arm up with heat, apply a magnesium transdermal salve, grab an old tennis ball, and roll the ball over the tense spots on each side of the elbow to reduce fascial contractures and relax the muscle more with a low-intensity trigger point approach.
The old tennis ball is essential as it is soft and squishy. Using a new tennis ball will be too firm, and rolling over the bony sites where the tendons originate will hurt like hell.
3. Take a Fresh Exam at the 72-hour mark. Since this athlete was cleared to throw, the next important step in reintegration is to evaluate arm strength to ensure that nothing has weakened and identify any imbalances.

4. Exercise selection starts with isometrics. Since my athlete needed medical attention, he will work with his athletic trainer at the school.
The high school does not have the ArmCare platform where the athlete will teach the clinician about the metrics, as we will be resources if needed to ensure his return-to-performance programming is evidence-based.
All training suggestions provided to the athlete will require approval from the clinical staff member. Given the pain-relieving properties of isometrics, which allow the muscle to contract without changing muscle length, we suggested the following exercise as a starting point for regaining strength and function.
5. Pay attention to load management. Just because this athlete has been cleared to throw doesn’t mean he can go bananas, even if he’s pain-free.
We start from ground zero with activation throwing, which is covered in our Building Data-Led Throwing Programs Course. In this phase, we are testing the throwing arm to see how it responds pre- and post-throwing before determining the next stage in throwing demands.
Quite often, people follow a throwing program with exponential periodization, which is risky and generally leads to future subsequent and repeat injuries by increasing the volume of throws and intensity together. Our approach undulates, wave-loading the demands for the athlete, so there are insights into small and large recovery points.
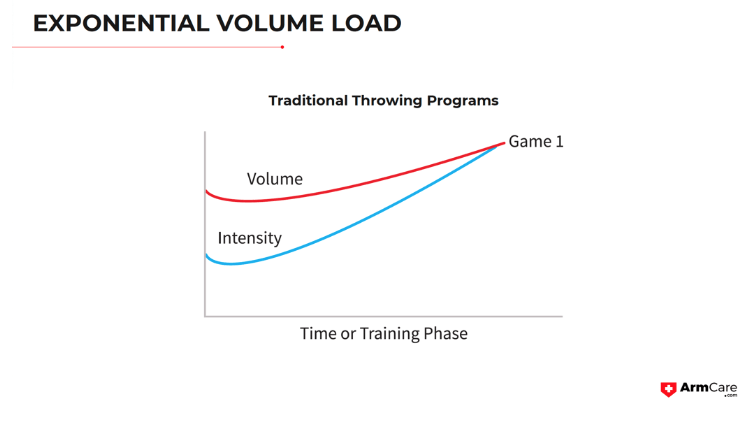
If you are interested in constructing a throwing program template that accounts for work-rest sequences, allows athletes to recover, and is databased, DO NOT follow the approach of continual increases in demand (time, days, throws, and effort) as you will increase risk of re-injury.
In conclusion, lateral epicondylitis poses a significant challenge for baseball pitchers, but a proactive and individualized approach to rehabilitation and prevention can significantly mitigate its impact.
By understanding the intricacies of the injury, implementing evidence-based rehabilitation strategies, and embracing preventive measures like strength monitoring, throwing athletes can foster arm health, reduce injury risk, and optimize long-term performance.
The bottom line is that lateral elbow injuries in throwing athletes are bizarre and can nag, so taking the right approach is crucial.
Now, I am off to play some tennis!